3 ways of styling SwiftUI views
Styling a view is the most important part of building beautiful user interfaces. When it comes to the actual code syntax, we want reusable, customizable and clean solutions in our code.
This article will show you these 3 ways of styling a SwiftUI.View:
- Initializer-based configuration
- Method chaining using return-self
- Styles in the Environment
As a general rule of thumb, any approach is viable. In the end, it comes down to your general code-style guidelines and personal preferences.
This is one is straight forward and can be visualized with an example rather quickly:
struct InitializerBasedConfigurationView: View {

    let backgroundColor: Color
    let textColor: Color

    var body: some View {
        Text("Hello, world!")
            .padding()
            .background(backgroundColor)
            .foregroundColor(textColor)
            .cornerRadius(10)
    }
}

InitializerBasedConfigurationView(backgroundColor: .green, textColor: .white)
This view takes two parameters backgroundColor and textColor, which are both required when instantiating the struct. They are also both constant let values, as the view most likely isn’t going to be mutated (at this point).
Conveniently Swift automatically synthesizes the (internal) required initializer, but they can also manually be defined be us:
struct InitializerBasedConfigurationView: View {

    let backgroundColor: Color
    let textColor: Color

    init(backgroundColor: Color, textColor: Color) {
        self.backgroundColor = backgroundColor
        self.textColor = textColor
    }

    var body: some View {
        Text("Hello, world!")
            .padding()
            .background(backgroundColor)
            .foregroundColor(textColor)
            .cornerRadius(10)
    }
}

InitializerBasedConfigurationView(backgroundColor: .green, textColor: .white)
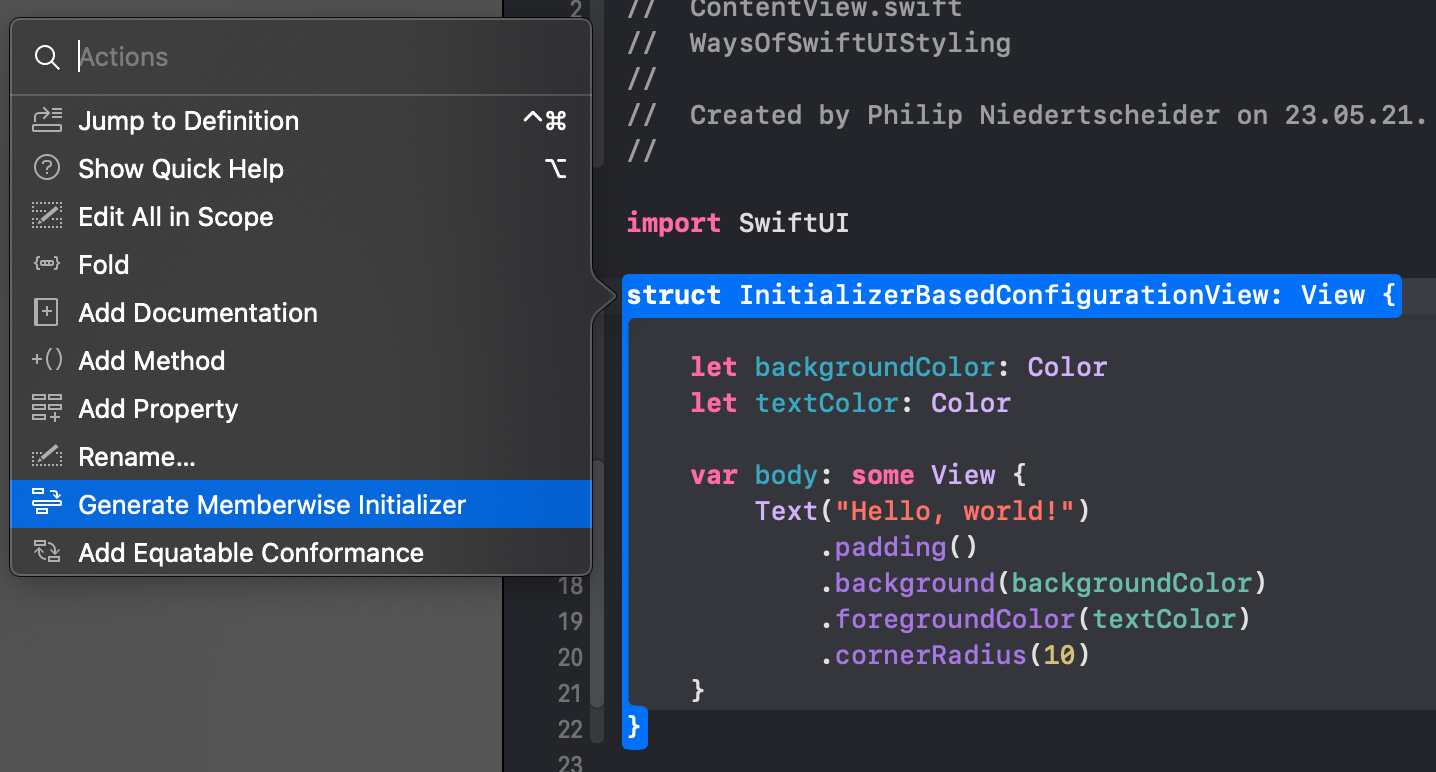
Quick Tip: Xcode also provides us with a built-in function to generate memberwise initializers. All you have to do is CMD(⌘) + left-click on the type name, and select the action.
Using a custom initializer allows us to add default values directly there without changing the let of the parameters to var ones:
struct InitializerBasedConfigurationView: View {

    let backgroundColor: Color
    let textColor: Color

    init(backgroundColor: Color = .green, textColor: Color = .white) {
        self.backgroundColor = backgroundColor
        self.textColor = textColor
    }

    // ... rest of view
}
As mentioned before, Swift synthesizes only internal initializers, so in case your view is part of a package and needs to be public, you are required to use this approach. Otherwise the application using the package won’t be able to find or instantiate the view.
On the other hand, if this view is only used inside your app, you can also let the Swift compiler do the work for you 🚀 All that is needed is changing from let to var and directly set the default values on the instance properties:
struct InitializerBasedConfigurationView: View {

    var backgroundColor: Color = .green
    var textColor: Color = .white

    // ... rest of view ...
}

// these are all valid now:
InitializerBasedConfigurationView()
InitializerBasedConfigurationView(backgroundColor: .blue)
InitializerBasedConfigurationView(backgroundColor: .black, textColor: .red)
Your views keep growing and requires more parameters to be set. As the initializer keeps growing too, it eventually becomes a large piece of code.
struct MethodChainingView: View {

    var actionA: () -> Void = {}
    var actionB: () -> Void = {}
    var actionC: () -> Void = {}
    var actionD: () -> Void = {}
    var actionE: () -> Void = {}

    var body: some View {
        HStack {
            Button(action: actionA) {
                Text("Button A")
            }
            Button(action: actionB) {
                Text("Button B")
            }
            Button(action: actionC) {
                Text("Button C")
            }
            Button(action: actionD) {
                Text("Button D")
            }
            Button(action: actionE) {
                Text("Button E")
            }
        }
    }
}

// Usage:
MethodChainingView(actionA: {
    print("do something")
}, actionB: {
    print("do something different")
}, actionC: {
    print("do something very different")
}, actionD: {
    print("do nothing")
}, actionE: {
    print("what are you doing?")
})
However, from my personal experience at some point the Swift compiler has too much work to do at the same time and simply gives up (it crashes).
One approach of breaking down large initializers (with default values) is using a return-self-chaining pattern:
struct MethodChainingView: View {

    private var actionA: () -> Void = {}
    private var actionB: () -> Void = {}

    // ... rest of viwe
    func actionA(_ action: @escaping () -> Void) -> Self {
        // You can't edit view directly, as it is immutable
        var view = self
        view.actionA = action
        return view
    }

    func actionB(_ action: @escaping () -> Void) -> Self {
        // You can't edit view directly, as it is immutable
        var view = self
        view.actionB = action
        return view
    }
}

// Usage:
MethodChainingView()
    .actionA {
        print("do something")
    }
    .actionB {
        print("do something different")
    }
As the view itself is immutable, but consists out of pure data (structs are not objects), we can create a local copy
with var view = self. As this is now a local variable, we can mutate it and set the action, before returning it.
Apart from manually configuring every single view we can define a global style guide. An example might look like the following:
enum Style {

    enum Text {

        static let headlineColor = Color.black
        static let subheadlineColor = Color.gray

    }
}

struct EnvironmentStylesheetsView: View {

    var body: some View {
        VStack {
            Text("Headline")
                .foregroundColor(Style.Text.headlineColor)
            Text("Subheadline")
                .foregroundColor(Style.Text.subheadlineColor)
        }
    }
}
Unfortunately, this solution has a big issue: Global static variables means, they are not customizable for different use cases (for example in an Xcode preview) 😕
Our solution is opting in for instance configuration once again:
struct Style {

    struct Text {

        var headlineColor = Color.black
        var subheadlineColor = Color.gray

    }

    var text = Text()

}

struct EnvironmentStylesheetsView: View {

    let style: Style

    var body: some View {
        VStack {
            Text("Headline")
                .foregroundColor(style.text.headlineColor)
            Text("Subheadline")
                .foregroundColor(style.text.subheadlineColor)
        }
    }
}
This looks promising, as we can now pass the style configuration into the view from where-ever we need it:
struct ContentView: View {

    var body: some View {
        // uses the default style
        EnvironmentStylesheetsView(style: Style())
    }
}

struct ContentView_Previews: PreviewProvider {

    static var previews: some View {
        // uses the customized style
        EnvironmentStylesheetsView(style: customizedStyle)
    }

    static var customizedStyle: Style {
        var style = Style()
        style.text.headlineColor = .green
        return style
    }
}
Quite a clean solution. But you might already be wondering “But wait! How is this a global solution?” and your doubts are justified! This solution requires us to pass the style down to every single view, just as in the following code snippet:
struct ContentView: View {

    var body: some View {
        // can this Style instance truely be considered "global"??
        Foo(style: Style())
    }
}

struct Foo: View {

    let style: Style

    var body: some View {
        Bar(style: style)
    }
}

struct Bar: View {

    let style: Style

    var body: some View {
        FooBar(style: style)
    }
}

struct FooBar: View {

    let style: Style

    var body: some View {
        Text("Content")
            .foregroundColor(style.text.headlineColor)
    }
}
It took three passes just to get the “global” style object into the nested FooBar view. This is unacceptable. We don’t want this much unnecessary code (especially because you also strive for clean code, don’t you?).
Okay so what else could we think off? Well, how about a mix between the static and the instance solution? All we need is a static object where we can set the style from Foo and read it from FooBar … sounds like some shared environment💡
SwiftUI introduced the property wrapper @Environment which allows us to read a value from the shared environment of our view🥳
As a first step, create a new EnvironmentKey by creating a struct implementing the defaultValue:
struct StyleEnvironmentKey: EnvironmentKey {
    static var defaultValue = Style()
}
Next you need to add the new environment key as an extension to the EnvironmentValues so it can be accessed from the property wrapper:
extension EnvironmentValues {

    var style: Style {
        get { self[StyleEnvironmentKey.self] }
        set { self[StyleEnvironmentKey.self] = newValue }
    }
}
Finally set the value using .environment(\.style, ...) in the root view and read the value using the keypath of the
style in @Environment(\.style) in the child views:
struct ContentView: View {

    var body: some View {
        Foo()
            .environment(\.style, customizedStyle)
    }

    var customizedStyle: Style {
        var style = Style()
        style.text.headlineColor = .green
        return style
    }
}

struct Foo: View {

    var body: some View {
        Bar()
    }
}

struct Bar: View {

    var body: some View {
        FooBar()
    }
}

struct FooBar: View {

    @Environment(\.style) var style

    var body: some View {
        Text("Content")
            .foregroundColor(style.text.headlineColor)
    }
}
Awesome! No more unnecessary instance passing and still configurable from the root view 🚀
Our environment solution is already working pretty nice, but isn’t the following even cleaner?
struct FooBar: View {

    @Theme(\.text.headlineColor) var headlineColor

    var body: some View {
        Text("Content")
            .foregroundColor(headlineColor)
    }
}
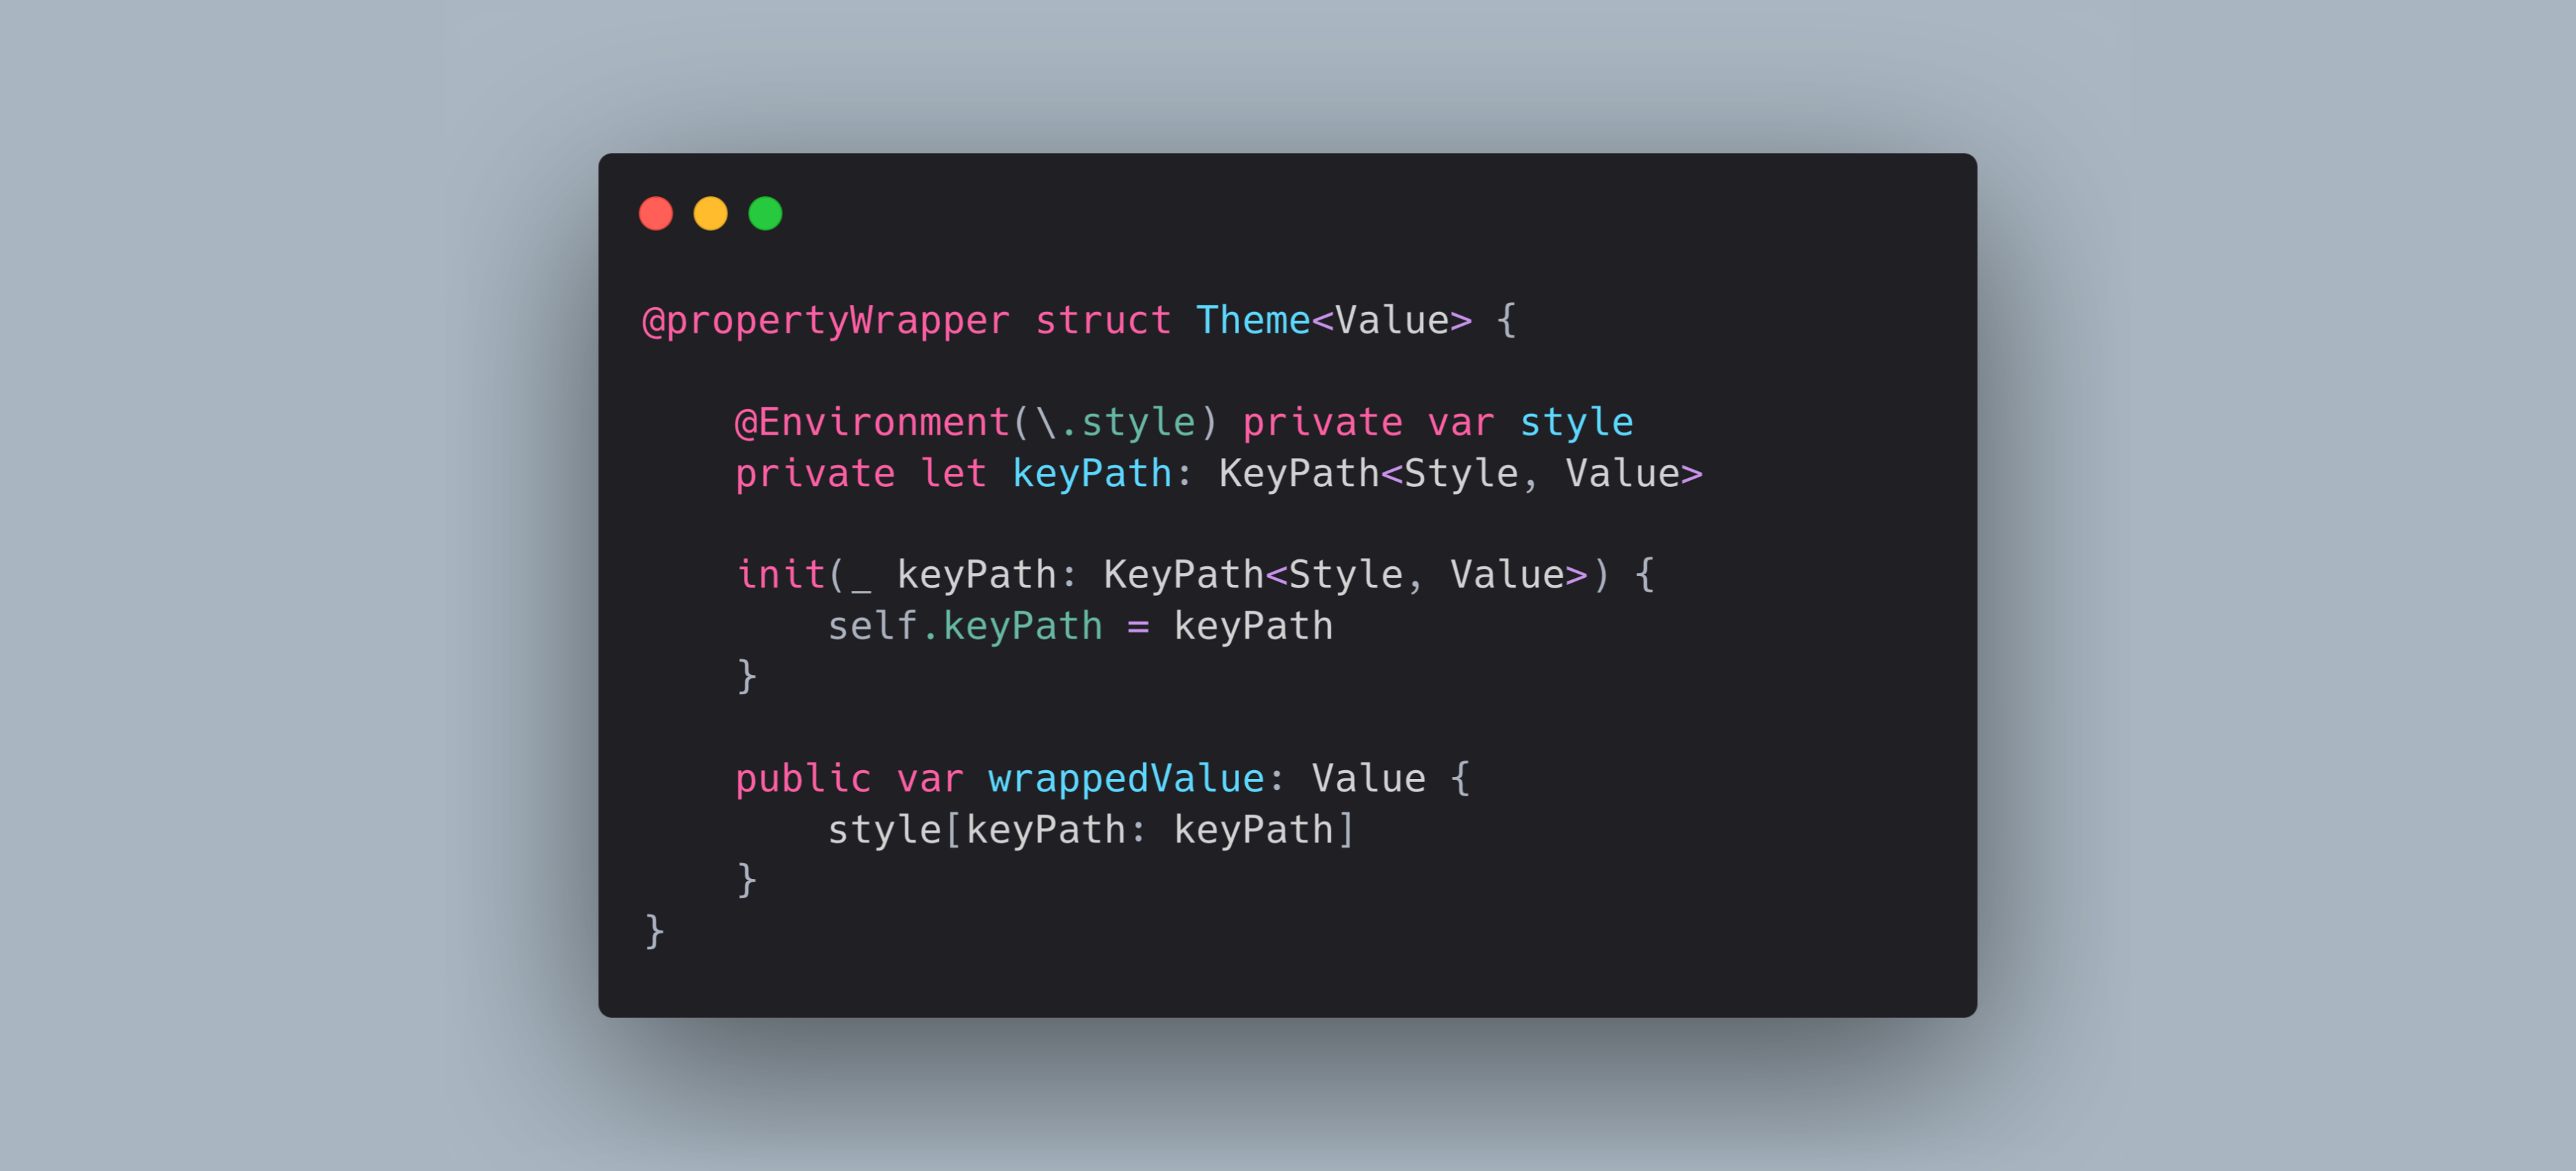
All you need for this beautiful syntax is creating a custom property wrapper @Theme which wraps our environment
configuration and accesses the style value by a keypath.
@propertyWrapper struct Theme<Value> {

    @Environment(\.style) private var style
    private let keyPath: KeyPath<Style, Value>

    init(_ keyPath: KeyPath<Style, Value>) {
        self.keyPath = keyPath
    }

    public var wrappedValue: Value {
        style[keyPath: keyPath]
    }
}
Even better, using a View extension allows us to hide the usage of Environment entirely!
extension View {

    func theme(_ theme: Style) -> some View {
        self.environment(\.style, theme)
    }
}

struct ContentView: View {

    var body: some View {
        Foo().theme(customizedStyle)
    }

    var customizedStyle: Style {
        var style = Style()
        style.text.headlineColor = .green
        return style
    }
}
Note: The reason the style is now called theme is quite honestly just a naming conflict of a property wrapper @Style with the struct Style. If you rename the style structure you can also use this name for the property wrapper.
SwiftUI offers multiple different ways of building our view hierarchy, and we explored just a few of them. Additional options such as e.g. ViewModifier already exist, and even more will surface in the future.
At the time of writing best practices don’t really exist yet, as the technology is still quite new. Instead we have different good practices to choose from and can focus on re-usability, customizability and cleanness of our code.
If you would like to know more, checkout my other articles, follow me on Twitter and feel free to drop me a DM. You have a specific topic you want me to cover? Let me know! 😃
Related Articles